Using gGui
Installing gGui
gGui is developed in the Python language and is hosted on PyPI. To install, ensure you have Python installed (version 3.6 or greater with Tcl/Tk support) on your system and simply use pip:
pip install ggui
Warning
Ensure pip is upgraded by executing (Linux, macOS) pip install –upgrade pip or (Windows) python -m pip install –upgrade pip. We are aware of users with out of date versions of pip experiencing installation issues with a ‘numpy==1.13.3’ issue when installing one of our dependencies, ‘bottleneck’.
Alternatively you may download and install directly from our GitHub repository, again using pip:
git clone https://github.com/gphoton-tools/ggui.git
pip install ./ggui
Warning
Users who wish to install directly using our setup.py file should note a known bug and workaround on our Known Issues page
gGui Target Catalog
gGui ingests a list of targets and associated paths to data products.
To create this file, you can use our make_param utility. Alternatively, you can write this file yourself. This file is written in the YAML standard and expects the following format:
<Target Name>
    <Data Product Type>
        <Band>: <Absolute path to file>
for example:
Andromeda Galaxy
    lightcurve
        NUV: /home/ggui_data/andromeda_nuv_lightcurve.csv
        FUV: /home/ggui_data/andromeda_fuv_lightcurve.csv
    coadd
        NUV: /home/ggui_data/andromeda_nuv_coadd.fits
    cube
        NUV: /home/ggui_data/andromeda_nuv_cube.fits
        FUV: /home/ggui_data/andromeda_fuv_cube.fits
Paths can also be specified relatively:
Andromeda Galaxy
    lightcurve
        NUV: ./ggui_data/andromeda_nuv_lightcurve.csv
        FUV: ./ggui_data/andromeda_fuv_lightcurve.csv
gGui is cross platform! The following target catalog is identical to the above:
Andromeda Galaxy
    lightcurve
        NUV: .\ggui_data\andromeda_nuv_lightcurve.csv
        FUV: ./ggui_data/andromeda_fuv_lightcurve.csv
gGui Configuration File
gGui configures itself, and its environment, using a python configuration file: ggui.conf. This file is located with the source code (the result of import ggui; import os; os.path.dirname(ggui.__file__)) and should be modified to fit your needs. The configuration file contains two fields.
[Mandatory Fields] defines which fields will be assigned to which axes. gGui comes out-of-the-box configured for gPhoton lightcurves, coadds, and cubes:
[Mandatory Fields]
lightcurve_x = t_mean
lightcurve_y = flux_bgsub

coadd_x = Right Ascension
coadd_y = Declination

cube_x = Right Ascension
cube_y = Declination
If multiple bands are provided for each data product type (i.e. lightcurves, coadds, cubes), gGui will automatically attempt to glue these fields together.
[Additional Fields to Glue] defines additional fields gGui should associate, and therefore glue together. Multiple fields can be specified, comma delimited. Once again, gGui is configured by default for gPhoton data products:
[Additional Fields To Glue]
cube = World 0
lightcurve = t0,t1
The default keyboard shortcuts for gGui may be modified here as well:
[Target Manager Shortcuts]
next_target = Right
previous_target = Left
Launching gGui
Once gGui is installed, gGui can be launched on the command line by invoking ggui.
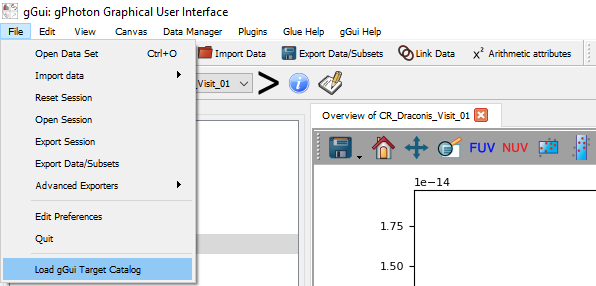
Your gGui target catalog can be loaded either from within gGui or as a command line argument, assuming you have a properly formatted target list, and have configured the gGui fields of your data. From within gGui, you can use the gGui Target Catalog Selector under the “File” Menu:
gGui can also be started with two independent flags:
ggui --target_list <path to gGui Target List>will automatically load specified target list(s) into a new gGui session.ggui --yaml_selectwill prompt the user to select your target list(s) before gGui loads. After which, gGui will load these targets into a new gGui session.
Thirdly if you are in an IPython environment, you can invoke gGui’s main() function to use these flags as well: from ggui import ggui; ggui.main(['--target_list', '<path to gGui Target List'])
gGui is built atop the Glue Visualization Python Library. To learn more about the framework, please see Glue’s Quickstart Guide:

gGui provides three major features atop Glue: The gGui Target Manager, gGui Notepad, and automatic tabview generation.
Demo Mode
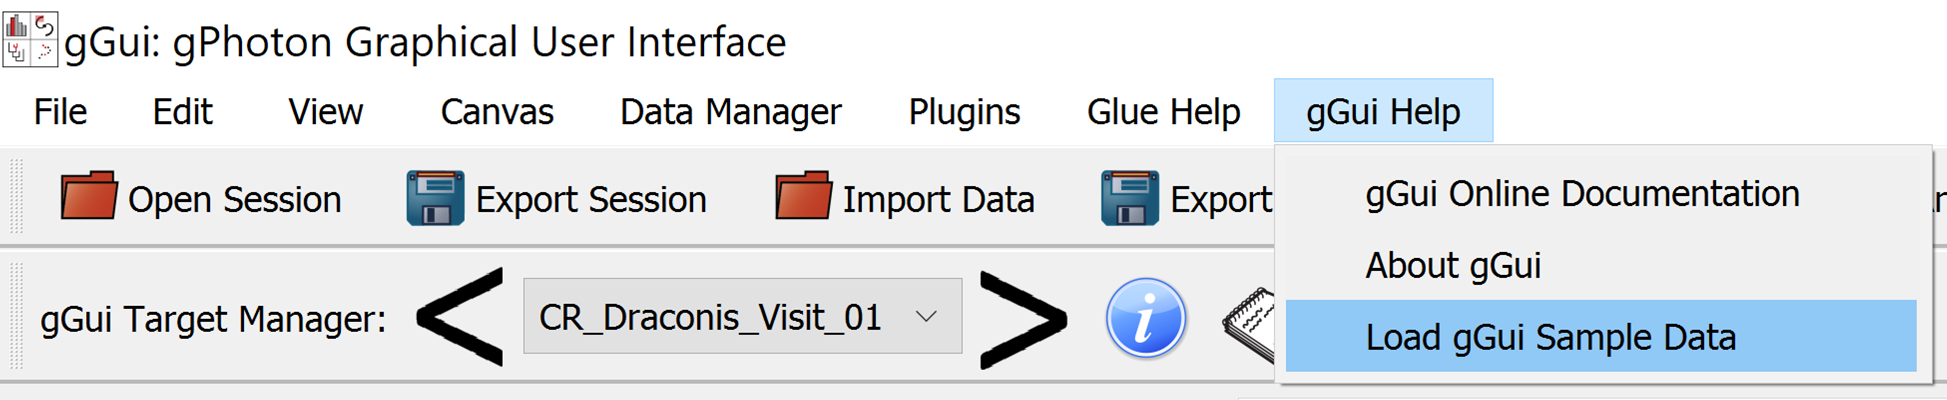
If you’re looking for a quick demo to try gGui, we have prepared some sample data for your to try out gGui’s feature set. Simply select “Load gGui Sample Data” under the “gGui Help” menu.
The gGui Target Manager
Accessed via the primary Glue toolbar in the upper left, the gGui Target Manager handles the loading of your target’s data:
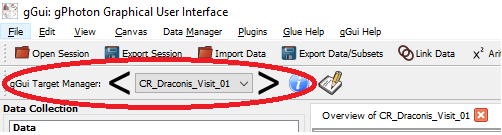
The Target Manager stores all of the targets identified by gGui from your target list(s). gGui only loads the data of the target selected, also known as lazy evaluation. One can advance targets by selecting the specific target from the dropdown list, or using the left/right arrows to advance to the previous/next target respectively. The information button will display the current target name and the parent gGui Target Catalog file this target originated from.
The gGui Notepad
The gGui Notepad features a collaborative space for teams to store observations, comments, and notes to each target. These notes are saved to the gGui target catalog. The gGui Notepad window can be launched via the notepad icon next to the Target Manager
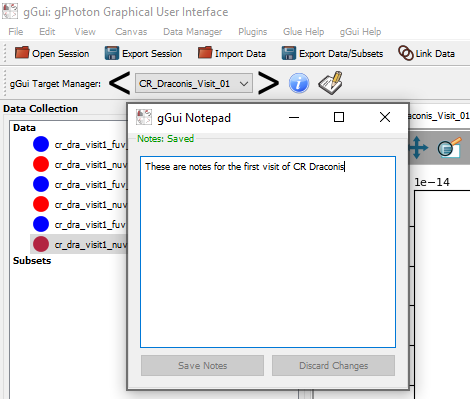
The notepad displays the state of the notes above the editing window.
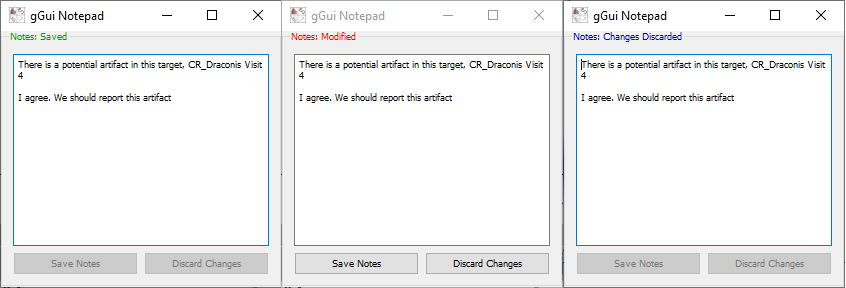
The gGui Notepad will show the current state of the notes via three status: (a) Saved, (b) Modified and Unsaved, (c) Discarded
“Save Notes” will overwrite the notes on disk with those entered in the editing window.
“Discard Changes” will discard all changes in the editing window and restore the window to the notes stored on disk, in the gGui Target Catalog.
gGui Automatic Tabs
gGui currently automatically generates (1) tab:
- The Target Overview Tab
Overview Tab
The Overview Tab is currently the only tab implemented in gGui. It is intended to give a quick glance into the three data products (lightcurves, coadds, cubes) of all available bands simultaneously:
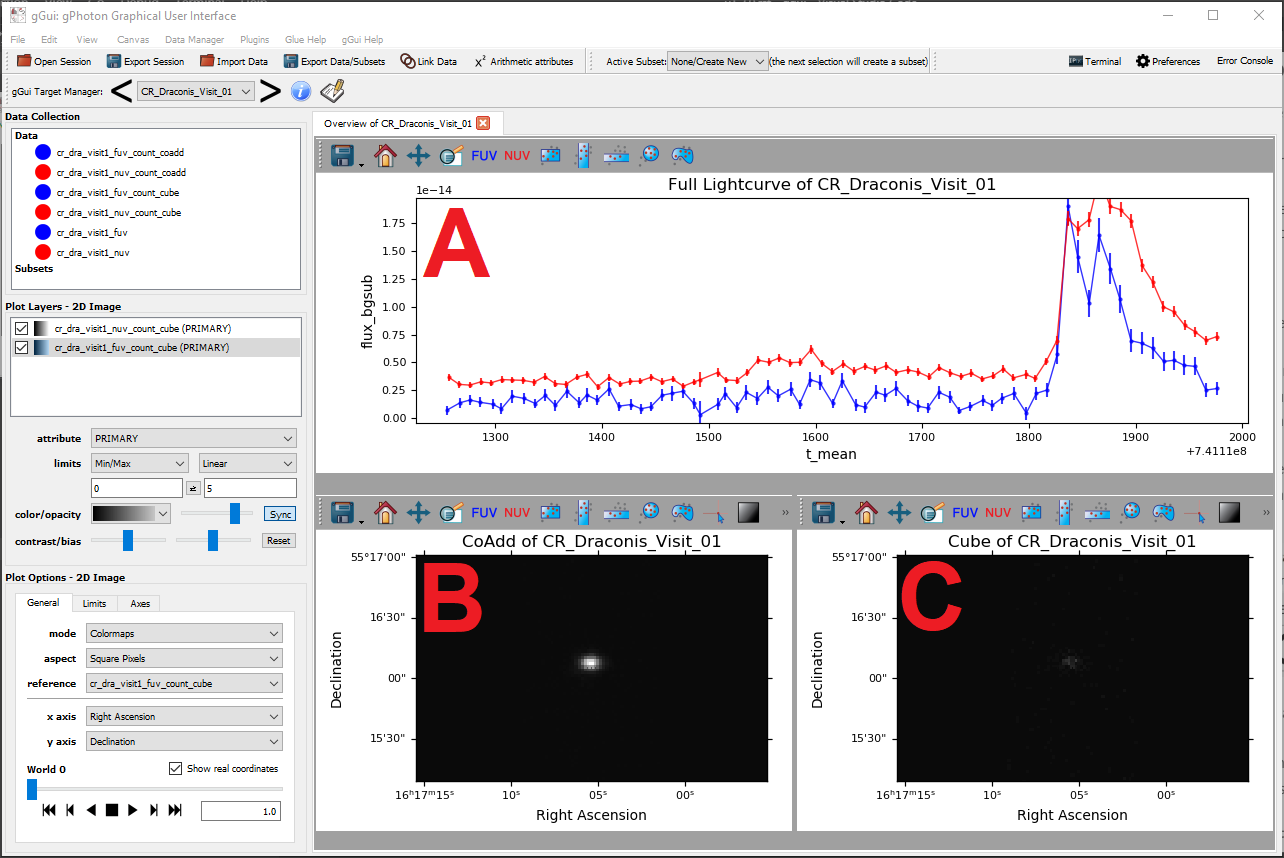
The Overview Tab summarizing the target’s (A) lightcurve, (B), Coadd, and (C) Cube, each with two bands (GALEX FUV, GALEX NUV)
When the user selects one of the widgets, gGui will display the appropriate plot options and layers for that particular widget.
Each widget generated by gGui includes FUV and NUV toggle tools. If your data originates from gPhoton, or is specified to have FUV and/or NUV bands, you can toggle the on and off via these tools.